hier die offizielle Anleitung zum modden:
1) Run RivaTuner and look at the main tab. You’ll see your current graphic processors configuration and amount of active pixel / vertex units in device status string, for example: NV40 (A1,12x1,5vp).
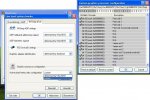
2) Click “Customize” button located at the right of device status string to activate device customization toolbar.
3) Click “Graphics subsystem diagnostic report” button in device customization toolbar to activate RivaTuner’s diagnostic module.
4) Scroll down “Report categories” list and tick “NVIDIA VGA BIOS information” report category.
5) Click “Capture report” button in the “Report preview” window to refresh report.
6) Scroll down “Report preview” window and find “NVIDIA VGA BIOS information” manually or simply double click “NVIDIA VGA BIOS information” category name in the “Report categories” list to automatically navigate to “NVIDIA VGA BIOS information” in the “Report preview”.
7) Look at line displaying “GPU units mask”. If you see 16x1,6vp there, it means that VGA BIOS allow activating all non-hardware masked GPU pixel/vertex units, so your configuration is determined by chip capabilities and you may forget about softmodding because your chips is 100% not softmoddable. If you see something different there (for example, 12x1,5vp) – you have chances to unlock some units. Take a note that only “GPU units mask” is important for board softmoddabbility detection. So don’t mix it with the current GPU configuration displayed in “Graphics core” line in “NVIDIA specific display adapter information” report category.
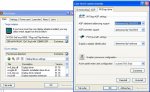
8) Click “Low-level system settings” button in device customization toolbar to activate “Low-level system tweaks” panel.
9) Select “NVStrap driver” tab.
10) Press “Install” button if you never installed the driver before. If you already have it installed after the previous version of RivaTuner, ensure that you have pressed “Reinstall” button to update the driver. This step is very important!
11) Select “Custom” in the “Active pixel/vertex units configuration” list to activate the “Customize” button, then click it to activate “Custom graphics processor configuration” dialog.
12) Tick all disabled pixel and vertex units and click “OK”.
13) Reboot system when prompted.
14) Start RivaTuner and look again at your current graphics processor configuration and amount of active pixel / vertex units in device status string. If you see no changes there –the units you tried to unlock are masked at hardware level, so you may uninstall NVStrap and forget about softmodding. Otherwise, enjoy free performance boost.
Important note for users / display adapter sellers / reviewers testing many NV4x based boards in succession: If you’re experimenting with NV40 softmodding, please ensure that you’ve uninstalled NVStrap or set “Active pixel/vertex pipelines” to “determined by VGA BIOS” before replacing an adapter with new one. Otherwise you’ll see the pixel/vertex units configuration set by NVStrap instead of hardware default configuration. If you forgot to do it before installing new adapter – simply uninstall NVStrap or click “Reset to default” button in the “Custom graphics processor configuration” dialog then reboot the PC to see hardware default configuration for new display adapter.
Leider ist meine nicht modbar...

Ps.: kennt einer eine Firma die sich sicher modden lassen ?
Grüße