In welche Partition ist TWRP zu installieren?

santander

Lieutenant
Registriert
Juni 2010
Beiträge
672
Hi!

Ich habe gestern mein Alt-Smartphone Nokia 6.1 nach 4 Jahren endlich (durch ein automatisiertes Tool eines Inders) gerootet bekommen und will nun die TWRP-Recovery einspielen. Bin damit auch schon weit gekommen, nur frage ich mich, in welche Partition es letztlich geflashed werden soll.

Zur Auswahl stehen: "Boot", "System", "System-Image", "Vendor", "Vendor-Image" und noch ein paar andere. Aber eben nicht "Recovery", was mich nun doch sehr verunsichert.

Ich war nun schon drauf und dran, das Image-File von TWRP in die "Boot"-Partition zu flashen. Habe nun aber doch schwere Bedenken, da ja da soweit ich weiss ausschliesslich der Bootloader reingehört, und ich das Smartphone damit zerschiessen könnte. Die Anleitung für TWRP ist auch sehr unverständliche in der Hinsicht, und verwirrt mich mehr, als dass sie aufkärt. So frage ich jetzt lieber einmal bei euch Experten nach, was gemacht werden muss.

Also: Ist es doch die "Boot"-Partition in die ich das TWRP.img reinflashen muss?

Hier die Anleitung zum Flashen von TWRP für mein Modell:
https://twrp.me/nokia/nokia6_1.html

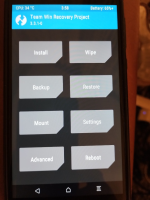
Und hier das Auswahlmenü von TWRP:
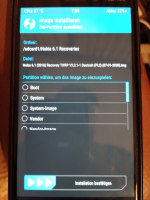
Bild_2023-09-06_073608914.png

Es ist wie gesagt noch nicht final geflashed, sondern momentan nur in den Handyspeicher (RAM) geladen.

Derzeit ist noch die Recovery von Lineage-OS installiert, die mir aber zu wenig Funktionen bietet, sodass ich gerne auf das bessere TWRP umsteigen möchte.

Hier ein Foto der momentan noch aktiven LIneageOS-Recovery, die ich durch TWRP ersetzen möchte:
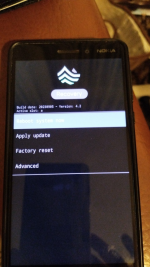
Bild_2023-09-06_075332727.png
 
Zuletzt bearbeitet:
santander schrieb:
Also: Ist es doch die "Boot"-Partition in die ich das TWRP.img reinflashen muss?
Nein, in die Boot-Partition kommt der Kernel, der beim Bootvorgang Android startet. TWRP kommt immer in die Recovery-Partition.

Mal ganz blöd gefragt, aber du bist dir bewusst, dass du in dem Menü, welches du im Screenshot von TWRP zeigst, auch noch runterscrollen kannst?
Dann sollten da auch noch mehr Auswahlmöglichkeiten erscheinen.

EDIT: ich sehe gerade in deinem anderen Screenshot, dass du aktuell Slot A ausgewählt hast. Demnach müsste dein Gerät schon A/B (Seamless Updates) unterstützen. Wenn dem so ist, dann sollte dein Gerät gar keine Recovery-Partition mehr haben. Zumindest ist das die Vorgabe von Google, dass die dedizierte Recovery-Partition wegfällt und die Recovery direkt in die Boot-Partition integriert wird.

Meines Wissens nach kann man dann auch TWRP nur "direkt" booten (so wie du es gemacht hast, ich nehme mal an per Fastboot).

EDIT 2: Siehe Post weiter unten von Mercator
 
Der entscheidende Schritt ist hier erklärt.

Navigieren Sie nach dem Booten zur Option „Erweitert“ > „Wiederherstellungs-Ramdisk installieren“. Dadurch werden Sie aufgefordert, das Image auszuwählen, von dem Sie TWRP installieren möchten. Wählen Sie das TWRP-Image aus, das Sie gerade heruntergeladen und in den Gerätespeicher kopiert haben. Fahren Sie mit der Installation dieses Images fort.

Somit muss man sich nicht darum kümmern wo TWRP installiert wird.
 
Lineage habe ich übrigens mittlerweile durch Libremobile-OS ersetzt, aber das nur nebenbei. Vielleicht sollte ich da das Boot-Image von deren Server auch noch mitinstallieren.

https://get.libremobileos.com/devices/PL2/builds

Mercator schrieb:
Der entscheidende Schritt ist hier erklärt: Navigieren Sie nach dem Booten zur Option „Erweitert“ > „Wiederherstellungs-Ramdisk installieren“. Dadurch werden Sie aufgefordert, das Image auszuwählen, von dem Sie TWRP installieren möchten. Wählen Sie das TWRP-Image aus, das Sie gerade heruntergeladen und in den Gerätespeicher kopiert haben. Fahren Sie mit der Installation dieses Images fort.
Hmmm... genau das verstehe ich jetzt nicht mit der Ramdisk. Also bei "Erweitert" des in den RAM-Speicher geladenen TWRP-Programmes die Option "Wiederherstellungs-Ramdisk installieren" auswählen?

Diese Option habe ich nicht gefunden. Muss ich mir später somit nochmal genauer ansehen.

Mercator schrieb:
Somit muss man sich nicht darum kümmern wo TWRP installiert wird.
Ja, so dachte ich mir das fast schon. Partition A/B ist bei dem Modell jedenfalls schon vorhanden.
 
Zuletzt bearbeitet:
santander schrieb:
Diese Option habe ich nicht gefunden. Muss ich mir später somit nochmal genauer ansehen.
Die ist auch definitv nicht vorhanden. Vielleicht liegt 's an der relativ alten TWRP-Recovery. Ist vom Dez. 2020.
 

[Guide] [How to install twrp recovery in a/b partitioned devices]​


I want to re-emphasize that if you're migrating from a different device, a clean flash with proper data formatting is mandatory. If you're transitioning from a stock ROM, data and file wiping is a necessary step. There's no bypass for it. Having clarified that, let's dive into the process of flashing TWRP.

It seems like you might be stuck in the era before Android devices with A/B partition schemes were introduced. Consequently, you could be improperly flashing the recovery because of misconstrued guides. Regardless, flashing a recovery shouldn't be this complicated. All you need to do is accurately follow the correct steps. Once you've done this a couple of times, it becomes second nature.

Always flash the files in the following sequence:

1) TWRP
2) Custom ROM

When it comes to flashing TWRP, it's crucial to understand why you're doing it and what exactly happens when you execute a command. This understanding is far better than blindly following some guide.

The first step is booting the TWRP Recovery and then flashing it onto your device.

Bear in mind that, unlike traditional partition devices, there's no separate recovery partition for A/B partition devices. What does this mean? It means you have to be smart and think about how to navigate this.

It's essential to remember that TWRP cannot be flashed directly via fastboot commands onto a neatly separated recovery partition because it resides inside the boot partition. Therefore, we will boot into recovery first and then flash it.

Use the following code to boot into recovery:

fastboot boot twrp.img

This will temporarily boot your device into recovery mode. Remember, this is temporary and won't be permanent.

Next, you have to delete all the data on your device. Navigate to 'Wipe', select 'System' and 'Data', and swipe right on the 'Swipe to Wipe' button to wipe the selected partitions.

Afterwards, go to 'Mount' and enable the 'MTP' option. Your device will now appear on your PC, allowing you to transfer the TWRP zip file, ROM, and anything else you need to move from your computer to your phone.

Flashing the actual TWRP zip file should now be simple. Go to 'Install', select the TWRP zip file, and swipe right on 'Swipe to confirm Flash'.

And here we go... At this point most of the people think they have flashed the TWRP and it should be installed. But it is not...

This is the part where most people stumble because they fail to follow the instructions carefully:

Reboot your device back into TWRP Recovery.

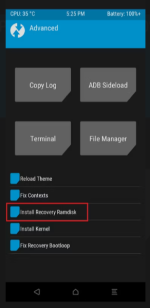
Navigate to the Advanced menu of TWRP and select "Install Recovery Ramdisk". (The "Install Recovery Ramdisk" option in TWRP is primarily used on A/B partition devices, which do not have a separate recovery partition. In these devices, the recovery is a part of the boot partition. The "Install Recovery Ramdisk" option allows you to install TWRP or another recovery onto the boot partition of your device. This effectively makes the chosen recovery the default recovery on the device, allowing you to access it every time you boot into recovery mode. This is commonly used to permanently install TWRP on devices with the A/B partition system.)

Once you understand this, select the "Install Recovery Ramdisk" option. The next step is to select the twrp.img file from your device's internal storage or wherever you've saved it, swipe to install, and then reboot. That's it! TWRP should now be successfully installed on your device.

It's not as complicated as it seems. In fact, typing all of this took longer than the process itself. Once you've done it a couple of times, you'll see what I mean.
(Quelle XDA-Developers)


Dazu habe ich noch ein paar Fragen. Muss jetzt aber weg. Mehr später...
 
Jetzt habe ich noch eine Anleitung gefunden, die Screenshots zeigt. Und zwar diese hier:

https://www.xda-developers.com/how-to-install-twrp/

TWRP-Advanced Ramdisk (07-09-2023).png


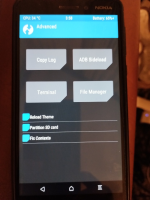
Die hat die benötigten zusätzlichen Funktionen wie "Install Recovery Ramdisk", über die meine Version nicht verfügt:

Bild_2023-09-07_040203822.pngBild_2023-09-07_040051628.png

Und genau deshalb kam ich ins Straucheln. An diesem Punkt kommt man auch nicht weiter, und scheitert letztlich, TRWP auf dem Nokia 6.1 zu installieren.
 
Zuletzt bearbeitet:
Zurück
Oben